Restoring an old wooden coffee table involves cleaning, repairing damage, sanding, staining or painting, and applying a protective finish.
The journey of how to restore an old wooden coffee table is more than just a DIY project; it’s an act of preserving history and giving a cherished piece of furniture a new lease on life. As someone who has spent countless hours bringing antique and vintage wooden pieces back from the brink, I understand the unique satisfaction that comes with transforming a neglected item into a functional work of art. This comprehensive guide will walk you through every essential step, from initial assessment to the final protective coat, ensuring you have the expertise to confidently embark on your own restoration project and achieve stunning, lasting results.
Assessing Your Coffee Table’s Condition
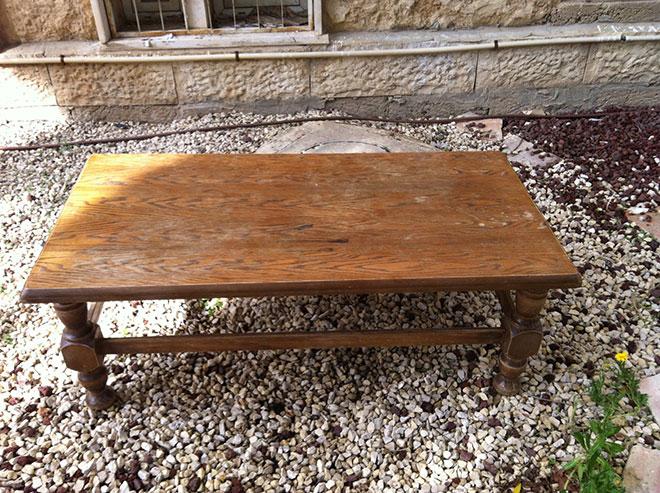
Before you dive into the restoration process, a thorough assessment of your old wooden coffee table is crucial. This initial evaluation helps you understand the extent of the damage, identify the type of wood and original finish, and plan your approach effectively. Carefully examine the tabletop, legs, and any drawers or intricate carvings for scratches, dents, water rings, loose joints, or even signs of wood rot. Understanding these issues upfront will streamline your material gathering and repair strategies, ensuring you know precisely how to restore an old wooden coffee table with the right techniques.

Gathering Your Tools and Materials
A successful restoration hinges on having the right tools and materials at hand. Think of it as preparing your toolkit for a delicate operation, where each item plays a specific role in bringing your old wooden coffee table back to its former glory. From cleaning agents to protective finishes, selecting quality supplies will make a significant difference in the ease of your work and the durability of the final result.
- Cleaning Supplies:
- Mild wood cleaner or mineral spirits
- Degreaser (for heavily soiled tables)
- Soft rags or sponges
- Old toothbrushes for crevices
- Repair Materials:
- Wood filler (matching your wood color if possible)
- Wood glue (PVA glue is common)
- Wood shims or dowels
- Clamps (bar clamps, C-clamps)
- Putty knife or small spatula
- Sanding Supplies:
- Orbital sander (optional, but highly recommended)
- Sanding blocks
- Assorted sandpaper grits (60, 80, 120, 180, 220, 320)
- Finishing Supplies:
- Wood stain (oil-based, water-based, or gel)
- Wood conditioner (if using stain on softwoods)
- Paint (if desired, suitable for wood)
- Primer (if painting)
- paintbrushes or foam applicators
- Clean lint-free cloths
- Protective topcoat (polyurethane, lacquer, varnish, or oil finish)
- Safety Gear:
- Safety glasses
- Dust mask or respirator
- Gloves (nitrile or chemical-resistant)
- Drop cloths or old newspapers

Source: youtube.com
Cleaning and Preparing the Surface
The first physical step in how to restore an old wooden coffee table is thoroughly cleaning and preparing its surface. Years of use often leave behind layers of dust, grime, wax buildup, and even remnants of spilled drinks. A clean surface is paramount for any subsequent repairs, sanding, or finishing processes, as it ensures proper adhesion and a smooth, even result.
Start by wiping down the entire table with a dry cloth or vacuum cleaner to remove loose dust and debris. For deeper cleaning, use a mild wood cleaner diluted according to product instructions, or a mixture of warm water and a small amount of dish soap. If there’s stubborn grease or sticky residue, mineral spirits or a dedicated degreaser can be effective. Apply the cleaner with a soft cloth, working in small sections, and immediately wipe dry to prevent water damage. For intricate carvings or tight corners, an old toothbrush can work wonders. This initial cleaning stage is where you truly start to connect with the piece, removing the superficial layers to reveal the underlying wood that needs your attention.

Repairing Damage and Imperfections
Once clean, your old wooden coffee table will reveal its true imperfections, which now need addressing. This stage, repairing damage and imperfections, is critical for both the aesthetics and structural integrity of the piece. Tackling these issues effectively is a significant part of understanding how to restore an old wooden coffee table to its optimal condition.
For minor scratches and shallow dents, wood filler is your best friend. Apply it with a putty knife, ensuring it’s pressed firmly into the void, then scrape off any excess flush with the surface. For deeper gouges or chipped edges, you might need to build up layers of filler or use a wood epoxy for added strength. When dealing with loose joints, disassemble them carefully if possible, clean out any old glue, apply fresh wood glue, and clamp them securely overnight. Always check for any wobbles or instability, as these structural issues should be addressed before moving on. My personal experience has taught me that patience here pays dividends; a solid repair makes all the difference in the longevity and stability of the restored piece.

Stripping the Old Finish (If Necessary)
Deciding whether to strip the old finish is a pivotal moment when you learn how to restore an old wooden coffee table. Stripping is typically necessary if the existing finish is severely damaged, flaking, or if you plan to drastically change the wood’s color with a new stain. If the old finish is relatively intact and you’re aiming for a minor refresh or just painting over it, thorough sanding might suffice, saving you time and effort.
However, for a truly professional restoration, especially on a valuable piece, stripping is often the preferred route. Chemical strippers are effective but require careful handling; always work in a well-ventilated area, wear heavy-duty gloves, and eye protection. Apply the stripper generously, allow it to penetrate as per product instructions, and then gently scrape away the softened finish with a plastic putty knife. For stubborn areas or intricate details, a stiff brush or fine steel wool can be useful. Alternatively, a heat gun can soften finishes, but this method demands extreme caution to avoid scorching the wood. After stripping, clean the residue thoroughly with mineral spirits or a stripper wash before sanding.

Sanding for a Smooth Foundation
Sanding is arguably the most crucial step in how to restore an old wooden coffee table, as it creates the perfectly smooth canvas for your new finish. Rushing this stage will lead to a lackluster result, regardless of how expertly you apply your stain or paint. The goal is to progressively remove imperfections, smooth out the wood grain, and create a surface that will evenly absorb your chosen finish.
Start with a coarser grit sandpaper (e.g., 80 or 100) to remove any remaining finish, minor scratches, or level out wood filler. If using an orbital sander, always keep it moving to prevent swirl marks. Gradually work your way through finer grits—120, 180, 220—and potentially even 320 for an exceptionally smooth feel. With each grit change, thoroughly clean the dust from the table surface and your sandpaper to avoid reintroducing coarser particles. Always sand with the grain of the wood, never against it, to prevent visible scratches. The final pass with a very fine grit will open the wood pores just enough to accept stain evenly. After the final sanding, meticulously clean off all sanding dust using a vacuum, tack cloth, or compressed air, as any remaining dust will compromise your finish.

Applying a New Finish: Stain, Paint, or Oil
With the surface impeccably smooth and clean, it’s time for the transformative step of applying a new finish. This is where your vision for how to restore an old wooden coffee table truly comes to life, whether you opt for the rich depth of stain, the vibrant appeal of paint, or the natural elegance of an oil finish.
If you choose stain, first apply a wood conditioner, especially on softer woods like pine or maple, to ensure even absorption and prevent blotchiness. Apply the stain with a brush, foam applicator, or lint-free cloth, working in the direction of the wood grain. Allow it to penetrate for the recommended time (usually 5-15 minutes) before wiping off the excess. For a deeper color, apply additional coats after allowing previous layers to dry completely. If painting, start with a good quality wood primer to ensure adhesion and hide any previous colors or wood grain if desired. Apply thin, even coats of paint, allowing ample drying time between each. For those who appreciate the natural beauty of wood, an oil finish (like tung oil or linseed oil) soaks into the wood, enhancing its grain and providing a subtle, satin sheen. Apply oil finishes liberally, let them soak in, then wipe off all excess before buffing. Regardless of your choice, consistency in application is key to achieving a flawless, professional look.

Protecting Your Restored Coffee Table with a Topcoat
The final and arguably most critical step in how to restore an old wooden coffee table is applying a protective topcoat. This layer safeguards your hard work from daily wear and tear, moisture, and UV damage, ensuring the beauty of your restored piece lasts for years to come. The choice of topcoat depends on the desired durability, sheen, and the type of finish underneath.
Polyurethane is a popular choice for coffee tables due to its excellent durability and resistance to scratches and moisture. It’s available in oil-based for a warmer, amber tone, or water-based for a clearer, non-yellowing finish. Apply thin, even coats with a high-quality brush, foam applicator, or sprayer, allowing sufficient drying time between coats and lightly sanding with 320-grit sandpaper for adhesion if recommended. Lacquer offers a hard, durable finish with a high sheen, often favored for a professional look, but requires spray application. Varnish provides similar protection to polyurethane but can be slower to dry. For oil finishes, additional coats of the same oil or a wax topcoat can offer enhanced protection and a softer feel. Always follow the manufacturer’s instructions for application, drying times, and curing, as proper curing is essential for maximum protection. My personal approach often involves multiple thin coats of a good quality polyurethane, sanded lightly between coats, for a remarkably durable and resilient finish.
Frequently Asked Questions
How long does it typically take to restore an old wooden coffee table?
The duration varies greatly depending on the table’s condition, the complexity of the damage, and the chosen finishing process, but a full restoration can range from a few days to a couple of weeks, allowing for drying and curing times. Patience is key to achieving excellent results, as rushing can lead to imperfections.
Can I restore a coffee table with veneer instead of solid wood?
Yes, you can absolutely restore a veneered coffee table, but with extra care. Avoid aggressive sanding or stripping that could damage the thin veneer layer, and opt for gentle cleaning and light sanding with fine-grit sandpaper. Repairing lifted veneer with wood glue and clamps is also a common and successful technique.
What’s the best way to remove water stains from a wooden coffee table?
For light water rings, you can often rub them gently with a non-gel toothpaste or a mixture of olive oil and white vinegar. For more stubborn stains, light sanding with fine-grit sandpaper, followed by re-staining and a new topcoat, may be necessary to fully address the discoloration.
Should I use a brush or a rag to apply wood stain?
Both brushes and rags have their uses for applying wood stain. Brushes offer more control and even coverage on larger, flat surfaces, while rags are excellent for wiping off excess stain and working on intricate details or carvings. Many restorers use a combination of both for best results.
How do I maintain my restored wooden coffee table?
To maintain your restored coffee table, regularly dust it with a soft cloth and wipe spills immediately to prevent water damage. Use coasters under drinks and avoid placing hot items directly on the surface. Occasionally, you can reapply a furniture polish or wax specifically designed for wood to nourish the finish.
Conclusion
Embarking on the journey of how to restore an old wooden coffee table is a truly rewarding experience, transforming a neglected piece into a cherished centerpiece. From the initial assessment and meticulous cleaning to the careful repairs, precise sanding, and thoughtful application of a new finish, each step contributes to its rebirth. This process not only revitalizes the furniture but also connects you to its history, instilling a sense of accomplishment and pride.
The satisfaction of seeing a once-worn table gleam with renewed vitality is unparalleled, reminding us that with a little effort and the right techniques, beauty can always be brought back to life. Don’t let that old, dusty coffee table in your attic or garage go to waste; consider it an opportunity to create something beautiful and unique with your own hands. We encourage you to gather your tools, embrace the challenge, and begin your own restoration project today. Share your progress and results in the comments below, or explore our other guides for more furniture restoration tips and inspiration.